Introduction
It is recommended to run Jupyter notebook on a compute node. The first part will describe principles to run Jupyter and to ssh tunnel Juypter traffics. The second part will show an integrated process with a SLURM script.
Jupyter/7.1.3 is available with iKernels for bash, python 3.6-3.12 and R.
Part One(an automatic way): Setup ssh tunneling through sbatch:
There is a template sbatch script to help setup Jupyter notebook and the tunneling. As of 11/30/2023, the repository has been updated to reflect current OS migration on FRCE nodes.
- On FRCE head node, "module load frce/1.0"
- Run "sbatch_templates.sh". You will have directory ./FRCE_EXAMPLES/slurm/ created from the previous step.
- Run "sbatch FRCE_EXAMPLES/slurm/jupyter_oel8.sh"
- With that SLURM job running, you will get an email about a command line to setup ssh tunneling and the url used to access Jupyter notebook from your web browser.
- In some cases that suggested local port may have aready been used. In those cases, you will need to change the local port in the tunneling and url. In the ssh tunneling command, the first port number is for a local port that you are going to use in your browser.
- In rare cases, configuration in files under ~/.jupyter/ may interfere with the script. If you don't get Jupyter session email, try to move that directory to a different place, such as mv ~/.jupyter ~/.jupyter_bak.
Part Two(a manual way): Basic Steps
Step1, A user needs to have an interactive SLURM session. With the following command, user will be prompted to be on a compute node terminal.
- srun --pty bash
Step2, Within the interactive session, setup environment necessary to run Jupyter.
- module load jupyter
Step3, Within the session, a user can start a jupyter notebook server with the following command with a selected port above 32768.
- jupyter-notebook --no-browser --ip $(hostname -i | sed "s/ /\n/g" | grep -v : ) --port 64000
Step4, take the hostname in the output line, such as fsitgl-hpc085 in the following example output. If the user defined port, for example 64000 above. If the port is not available, jupyter will assign another port number in the output.
- http://fsitgl-hpc085p.ncifcrf.gov:64000/?token=ea8749e77c1045bf0b4a8272f2da6f505dab4d49069b2aa9
Step5, tunnel the tcp traffic from your desktop to jupyter though head node. We use 8888 of the local desktop in the following example.
- From a Mac or Linux desktop:
- ssh -L 8888:fsitgl-hpc085:64000 userid@fsitgl-head01p
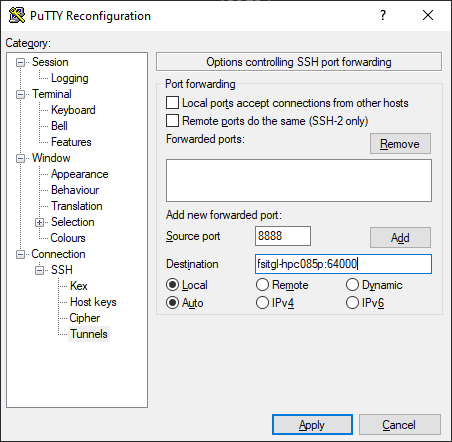
- From a Windows desktop using PuTTY:
- Right-click on the title bar of the PuTTY window used to log into the cluster to bring up a menu. Select Change Settings.
- In the resulting menu, select Connection ⇒ SSH ⇒ Tunnels. Add the ports from the jupyter output as shown here.

- Click Add and then Apply.
Step6, on a web browser in your desktop, open the following url. Take the url in Step3, and replace fsitgl-hpc085p.ncifcrf.gov:64000 with localhost:8888 to have the following url to access from your web browser.
- http://localhost:8888/?token=ea8749e77c1045bf0b4a8272f2da6f505dab4d49069b2aa9
Comments:
In the above example, we have two sets of tcp ports, such as 8888 and 64000 in the above example. Each set should be consistent. The 8888 in Step5 should match 8888 in Step4, and 64000 in Step3 should match the 64000 in Step4.

